This is the seventh part in a seven-part series about the JavaScript framework, Angular 5
.
In this part, we’ll go over turning our application into a News Application
.
This is not intended to be a complete guide, but rather an overview of the basics to get you up and running so you can get to know using Angular Services
and how to turn your Angular 5
application into a News app
.
Article Series:
Final Demo here
I’m going to turn the application We created in the 6 previous articles, so you have to check them first! No, you must check all of them!
Our News app
will be:
- a Progressive web application (
PWA
) - With
Angular Material
Design - with a grid-system using
Flex-Layout
- Deployed to
Netlify
- With 2 dynamic themes
- Later we can improve it with more option you can suggest or ask me what you want in the next article
Build News Service
In the previous articles We created a component named posts
. I’ll use it to show our news posts.
First Let’s discuss the layout of our posts component
.
I want to build two things: part for filtering the news and part for displaying the news itself
I’ll use newsapi.org
’s api to get the news, so you have to signup and get a key
.
Next, we have to create new angular service
to get the news from the API
. I’ll name it news service
.
Now, in your application’s root directory open your terminal and run:
ng g service services/news --module app.module.ts
This command will create our news service
and will update our app.module.ts
.
We need to add something first in our app.module.ts
to use it in new.service.ts
import { HttpModule } from "@angular/http";
and add it to the imports
Now your app.module.ts
should look like
import { BrowserModule } from "@angular/platform-browser";
import { NgModule } from "@angular/core";
import { BrowserAnimationsModule } from "@angular/platform-browser/animations";
import { MaterialModule } from "./material.module";
import { FlexLayoutModule } from "@angular/flex-layout";
import { HttpModule } from "@angular/http";
import { AppRoutingModule } from "./app-routing.module";
import { FormsModule, ReactiveFormsModule } from "@angular/forms";
import { ServiceWorkerModule } from "@angular/service-worker";
import { AppComponent } from "./app.component";
import { environment } from "../environments/environment";
import { PostsComponent } from "./posts/posts.component";
import { HomeComponent } from "./home/home.component";
import { NavbarComponent } from "./navbar/navbar.component";
import { ThemeService } from "./services/theme.service";
import { NewsService } from "./services/news.service";
@NgModule({
declarations: [AppComponent, PostsComponent, HomeComponent, NavbarComponent],
imports: [
BrowserModule,
BrowserAnimationsModule,
MaterialModule,
FlexLayoutModule,
AppRoutingModule,
FormsModule,
ReactiveFormsModule,
HttpModule,
ServiceWorkerModule.register("/ngsw-worker.js", {
enabled: environment.production
})
],
providers: [ThemeService, NewsService],
bootstrap: [AppComponent]
})
export class AppModule {}
First Let’s explain what we’re going to do, I know that this part is so boring but you have to know it, so you can handle things later yourself.
Next you have to replace your-key-here
with your API key
you got from your account here > https://newsapi.org/account
Details of News Service
Next we need to build the functions to call the api
from our news.service
We’ll build 3 functions getTopHeadLines()
, getNewBySource()
and getSources()
.
getTopHeadLines
: will get the Top Headlines news. and this will be displayed as the default news.
getSources
: it will give us all the news sources, we’ll use them to filter our news.
getNewBySource
: We’ll use the previous function to get the sources to use it in this function.
Here’s the code of our service
import { Injectable } from '@angular/core';
import { Http, Headers, RequestOptions } from '@angular/http';
import { environment } from '../../environments/environment';
@Injectable()
export class NewsService {
key = 'your-key-here';
constructor(private http: Http) { }
getTopHeadLines(){
return this.http.get('https://newsapi.org/v2/top-headlines?country=us&category=business&apiKey='+this.key);
}
getNewBySource(source){
return this.http.get('https://newsapi.org/v2/top-headlines?sources='+source+'&apiKey='+this.key);
}
getSources(){
return this.http.get('https://newsapi.org/v2/sources?apiKey='+this.key);
}
}
Adding `News Service to posts.component.ts
Now we need to edit our posts.component.ts
. As we created 3 functions in our service
we’ll use them here in posts.component.ts
First
you have to import new.service.ts
.
Second
create 2 variable:
1st: will be news= {articles:[]}
2nd: will be newsSources= {sources:[]}
Third
I’ll display articles from getTopHeadLines
in ngOnInit
and the new resources
also.
Here’s the code of our src/posts/posts.component.ts
import { Component, OnInit } from "@angular/core";
import { NewsService } from '../services/news.service';
@Component({
selector: "app-posts",
templateUrl: "./posts.component.html",
styleUrls: ["./posts.component.scss"],
providers:[NewsService]
})
export class PostsComponent implements OnInit {
news= {articles:[]};
newsSources= {sources:[]};
filterSource='google-news';
constructor(private newsService: NewsService){}
ngOnInit() {
this.newsService.getTopHeadLines()
.subscribe(
response => this.news = response.json()
);
this.getnewsSources();
}
filterNews(source) {
this.news={articles:[]};
this.newsService.getNewBySource(source)
.subscribe(
response => this.news = response.json()
);
}
getnewsSources() {
this.newsService.getSources()
.subscribe(
response => this.newsSources = response.json()
);
}
}
For the view of this component in posts.component.html
I made 2 parts as I said at the beginning of this article:
one for filtering the news and one to show them. I used Flex-Layout
also.
I added two things for the posts:
Fix damaged images
You might noticed that there are some images that does not load correctly, to solve this problem I added this attribute onError="this.src='/assets/blank.png';"
It will display default image for damaged images.
Spinner loader
Also I added a spinner to been displayed while our application fetching the data from the api
, I used the Angular Material
module MatSpinnerModule
.
Here’s the code of posts.component.html
<div
class="container margin-top"
fxLayout="wrap row"
fxLayout.xs="column"
fxLayoutGap="1%"
fxLayoutAlign="center"
>
<mat-card class="filter">
<form #filternewsForm="ngForm">
<mat-form-field>
<mat-select
placeholder="News Source"
[(ngModel)]="filterSource"
name="source"
required
>
<mat-option
*ngFor="let source of newsSources.sources"
[value]="source.id"
>
{{source.name}} - {{ source.language }}
</mat-option>
</mat-select>
</mat-form-field>
<button
mat-raised-button
color="primary"
(click)="filterNews(filterSource)"
[disabled]="!filternewsForm.form.valid"
>
Filter News to
<span style="text-transform: capitalize; ">{{filterSource}}</span>
</button>
</form>
</mat-card>
</div>
<div class="loader" *ngIf="!((news.articles)?.length > 0)">
<mat-spinner></mat-spinner>
</div>
<div
class="container"
fxLayout="wrap row"
fxLayout.xs="column"
fxLayoutGap="1%"
fxLayoutAlign="center"
>
<div *ngFor="let post of news.articles" fxFlex="20%">
<mat-card class="singleNews">
<img
mat-card-image
src="{{post.urlToImage}}"
onError="this.src='/assets/blank.png';"
/>
<div class="cardbody">
<mat-card-title>{{post.title}}</mat-card-title>
<mat-card-content> <p>{{post.description}}</p> </mat-card-content>
</div>
<mat-card-actions align="end">
<a href="{{post.url}}" target="_balnk" mat-raised-button color="accent"
>Read More</a
>
</mat-card-actions>
</mat-card>
</div>
</div>
I did some small styling in src/app/posts/posts.component.scss
.singleNews {
margin-bottom: 15px;
img {
height: 200px;
}
mat-card-title {
font-size: 16px;
font-weight: bold;
}
.cardbody {
height: 100px;
overflow-y: auto;
margin: 0 -15px;
padding: 10px;
}
}
.filter {
margin-top: 100px;
margin-bottom: 50px;
}
and I added some styling for the loader in src/styles.scss
@import "./assets/styles/material-theme";
body {
margin: 0;
}
.loader mat-spinner {
margin: 10px auto;
}
Change homepage content to Top News
For our home screen I want to make it dynamic, so let’s display our Top Hot-lines there.
We’ll use the same code and service:
Open src/app/home/home.component.html
and add the following code:
<div
class="homebtn"
fxLayout="wrap row"
fxLayout.xs="column"
fxLayoutGap="1%"
fxLayoutAlign="center"
>
<a routerLink="/posts" mat-raised-button color="primary"
>Choose News Source</a
>
</div>
<div class="loader" *ngIf="!((news.articles)?.length > 0)">
<mat-spinner></mat-spinner>
</div>
<div
class="container"
fxLayout="wrap row"
fxLayout.xs="column"
fxLayoutGap="1%"
fxLayoutAlign="center"
>
<div *ngFor="let post of news.articles" fxFlex="20%">
<mat-card class="singleNews">
<img
mat-card-image
src="{{post.urlToImage}}"
onError="this.src='/assets/blank.png';"
/>
<div class="cardbody">
<mat-card-title>{{post.title}}</mat-card-title>
<mat-card-content> <p>{{post.description}}</p> </mat-card-content>
</div>
<mat-card-actions align="end">
<a href="{{post.url}}" target="_balnk" mat-raised-button color="accent"
>Read More</a
>
</mat-card-actions>
</mat-card>
</div>
</div>
And replace the code into src/app/home/home.component.ts
with
import { Component, OnInit } from '@angular/core';
import { NewsService } from '../services/news.service';
@Component({
selector: 'app-home',
templateUrl: './home.component.html',
styleUrls: ['./home.component.scss'],
providers:[NewsService]
})
export class HomeComponent implements OnInit {
news= {articles:[]};
constructor(private newsService: NewsService){}
ngOnInit() {
this.newsService.getTopHeadLines()
.subscribe(
response => this.news = response.json()
);
}
}
Finally let’s add some styling open src/app/home/home.component.scss
.singleNews {
margin-bottom: 15px;
img {
height: 200px;
}
mat-card-title {
font-size: 16px;
font-weight: bold;
}
.cardbody {
height: 100px;
overflow-y: auto;
margin: 0 -15px;
padding: 10px;
}
}
.homebtn {
margin: 40px 0;
}
Now our application is done! Here’s the final result
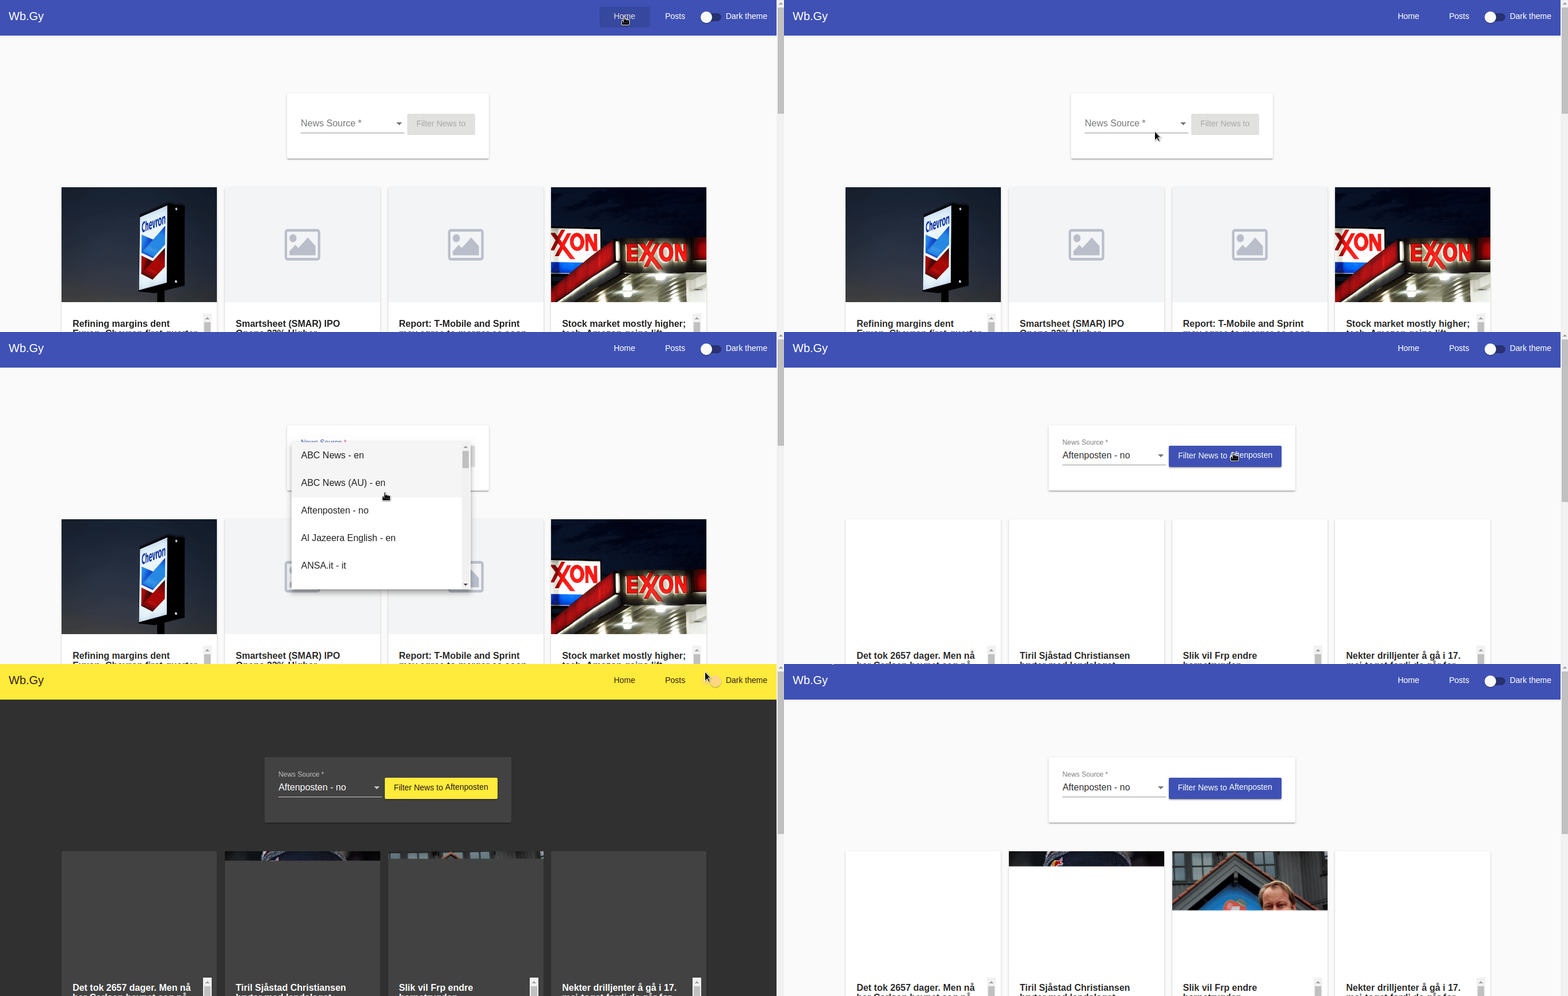
And you can find the demo here
Some useful Links:
- 👨️ My Website/Portfolio
- 🔥 Get your $50 in FREE hosting credit HERE
- 🤑️ No Stripe? How To Get Paid With Payoneer ⇒ $25 + $10 Sign UP Bonus